

Top Down Token
Right click on image to download PNG
General aiming
You can chose two types of aiming: close-quarters (melee) and distance attacks (missile). This is in general refering to all weapons, items and spells that are used as weapons.
As a beginner, your starting position is First Step – Rookie. To determine if you hit your target, you will roll two ten-sided dice (2d10) and use the result to generate a number between 0 and 99. Check the tables below for the right movement, you need to get the number or higher that is in the table.
By default, the general aiming is designed for objects of average difficulty. However, if you wish to accomplish a more challenging task, like hitting a flying dragon in the eye, the Game Master (GM) will request you to execute one or more special maneuvers. This additional advantage will help you take on more formidable challenges and attempt extraordinary feats in the game.
Even if you land what seems like a perfect hit, your opponent might still use their Reflex ability to dodge, leap away, or block with a shield. So don’t count your chickens before they hatch. When a defender uses Reflex, Acrobatics, Block, or any other special maneuver, a successful defense against an evenly matched attacker typically means they avoid the hit entirely. However, if the GM deems the threat particularly serious, the result may instead be reduced to half damage — and in the case of an exceptionally difficult success, the defender might only avoid three-quarters of the damage.
If you succeed in your general attack roll, you then roll for Focused Aim, which determines the specific body part you strike.
All spells require a general aiming roll to be effective — if you miss, the spell fails. If the target is a non-living object, like a dagger, arrow, or similar item, it’s treated as a stationary target at close range. If a spell requires a Focused Aim roll to strike a specific body part, the GM will let you know.
When confronted with a challenging situation that requires additional expertise, refer to the special maneuvers >>>

Progress
Each time you find yourself in a situation requiring aiming and roll a result between 90 and 99 (on a scale of 0-99), you earn one star. Once you collect five stars, you advance on the aiming progression tables. Progression is specific to the weapon group you are using.
There are several options for spellcasting; refer to the magic traits section for more information.>>>

Melee aiming table
ROOKIE
50
60
70
75
80
85

TRAINEE
44
52
60
71
76
81
SKILLED
40
45
50
65
70
75

VETERAN
28
35
43
56
64
69
CHAMP
20
30
40
50
60
65

HERO
14
21
28
44
54
63
ELITE
10
15
20
40
50
60
MASTER
5
9
14
28
38
48

LEGEND
2
5
10
20
30
40
Missile aiming table
ROOKIE
70
77
85
95
98
–
TRAINEE
65
73
82
92
97
98
SKILLED
60
70
80
90
95
97
VETERAN
48
58
68
84
92
97
CHAMP
40
50
60
80
90
95
HERO
28
38
48
74
86
93
ELITE
20
30
40
70
80
90
MASTER
14
21
28
64
75
86
LEGEND
10
15
20
60
70
80
Missile aiming distance
The table above applies to a distance of 50 feet (10 squares). For every doubling of the distance, you should adjust one step downward on the Rookie-Legend scale. For smaller distance adjustments, use the intermediate states to calculate your score.
The tables are designed for combat against a medium-sized opponent. Increasing the opponent’s size moves you one step left on the scale (e.g., from Trainee to Rookie), while decreasing the size moves you one step right (e.g., from Trained to Skilled).
Any distances smaller than those mentioned, or if there are obstacles or greater difficulty, like for flying situations, these will be determined by the Game Master (GM) during the gameplay. The GM will account for specific conditions >>> to maintain an engaging and challenging experience for the players.
Focus aim
You have the freedom to choose which body part you intend to strike. After making your decision, roll a 1d10. Rolling a one automatically results in a miss, while the meanings of the other numbers in the aiming squares are explained in the section below.
In melee, there could be limitations on your targets, especially if your opponent is of considerable size. To understand these limitations based on your opponent’s size, please visit the following location: >>>
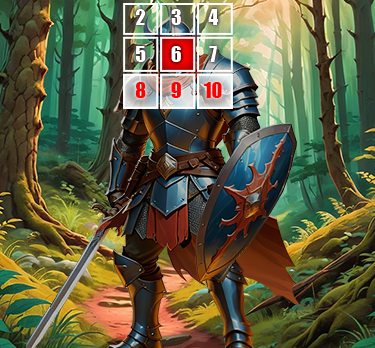
The Head
The head has the fewest hit points but is the hardest to target. Of the nine target squares, only square 6 represents the head and neck. Squares 2, 3, 4, 5, and 7 are misses, while 8, 9, and 10 hit the torso. Precision is vital when aiming for the head to maximize the effectiveness of your attack.
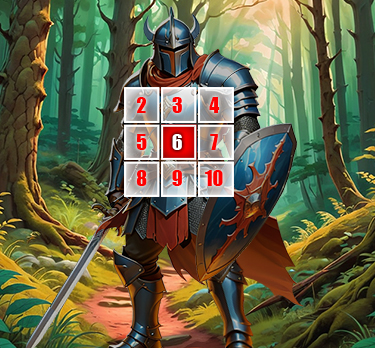
The Torso
If you’re unsure where to aim, the torso is the safest target for a guaranteed hit (unless you roll a 1). However, certain squares may have armor or protections that block damage, requiring careful strategy. Weigh the odds and defenses when deciding to attack the torso.
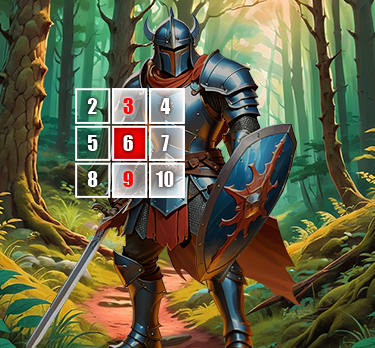
Right Arm
Targeting the weapon arm may involve GM adjustments for its motion. A roll of 6 is a direct hit, with rolls of 3 and 9 also succeeding. All other rolls miss. Memorize these numbers to increase your accuracy when aiming for this important limb.
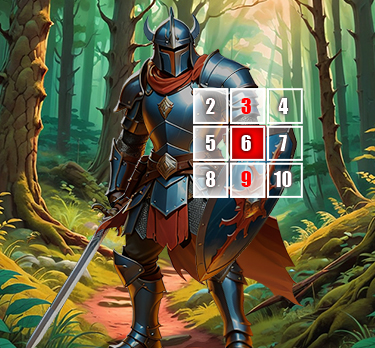
Left Arm
Aiming for an empty or similarly armed left arm follows the same process as the right arm. If the arm holds a shield, aiming remains the same, but the shield may reduce damage. Analyze the arm’s role and equipment to optimize your attack strategy.
Right Leg
Aiming at the right leg is straightforward, but even a solid hit might be negated by defensive tactics. Striking the leg can limit movement but doesn’t guarantee full success. Always adapt your strategy to maximize impact and overcome defenses.
Left Leg
The left leg can be targeted like the right, but hitting different body parts provides varied benefits. Striking arms might disarm opponents, while targeting legs hinders mobility. Consider the tactical advantages when choosing where to strike in battle.
The table above is aiming between medium size against medium sized. For different sizes see Aming Option >>>
Multiple aim
Multiple aim isn’t so different from focused aim—rather than seeing the target as a single person with body parts, you see it as a group of people.

Basically, almost any attack can be used for multi-aim—a spear can strike enemies standing in a line, a fireball can engulf multiple targets, and if you’re a Kinetic Warden hurling a massive block of stone, you might try to make it crash down on several foes at once. Since multi-aiming involves additional dice rolls, consider when to use it to avoid slowing down the flow of the game.
When targeting multiple enemies with a spell, use the AIMING trigger.

When you attempt to hit multiple targets, work with the GM to visualize the positioning and apply the aiming square. If you roll a six, you hit all the targets; any other number means you strike whatever is ‘behind’ them instead. After that, you still need to perform a focus aim—either for the entire group to determine hit location, or, if you want to go full nerd mode, roll separately for each individual target. Just keep in mind that this can slow down the game. The simplest method is to assume hits land on the torso, since it’s the largest body part.

